
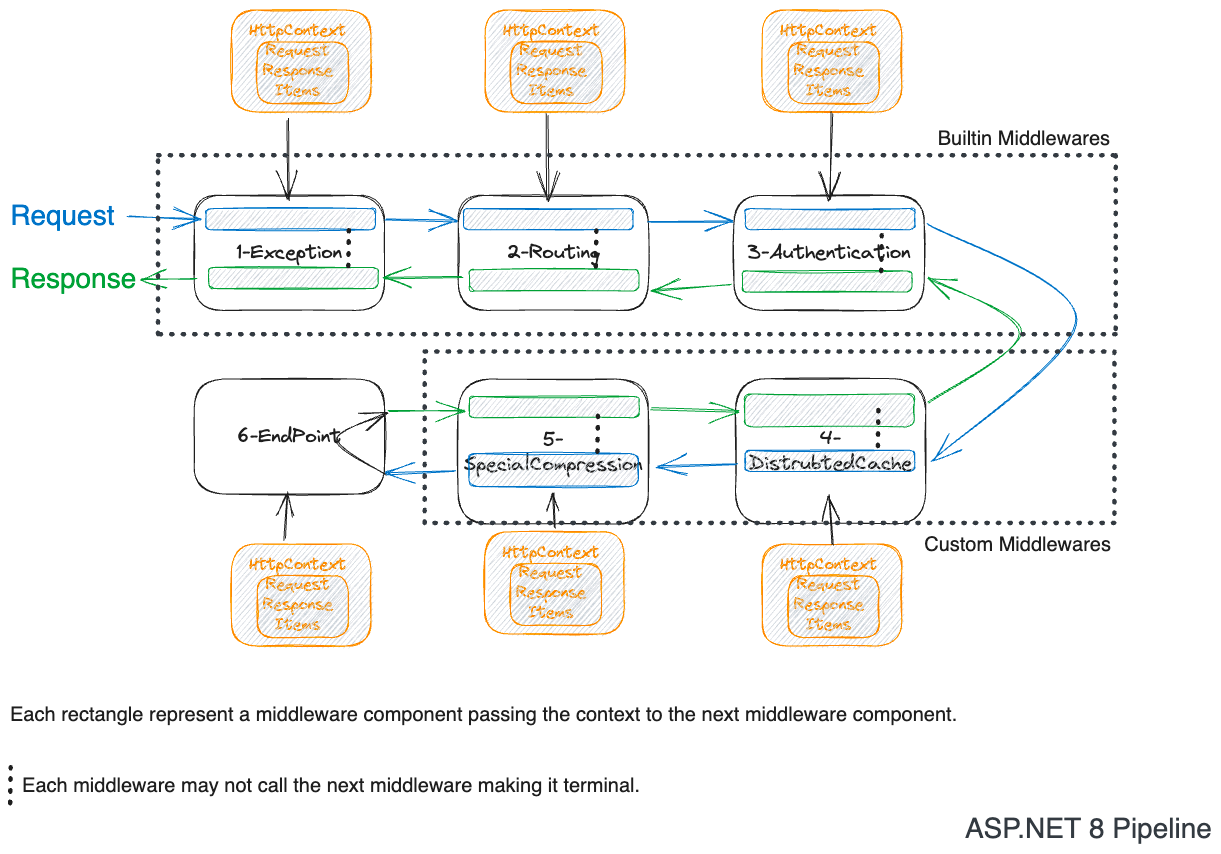
Middleware is a function in then ASP.NET 8, when many functions are invoked one after the other like a chain; it becomes a middleware pipeline. The middleware pipeline is responsible for handling the incoming HTTP request and outgoing HTTP response.
For in depth understanding of the middleware you can read my blog post here.
This is a series of blog posts in which I will cover all the builtin middlewares in ASP.NET 8.
Overview
There are 16 builtin middlewares in ASP.NET 8 to build a REST API. This post will cover two of them.
Host Filtering Middleware
Purpose
Allow requests only from the allowed hosts using the host header of HTTP Request but only serve the request if the host header is in the allowed list.
Defaults
- AllowedHosts: *
- IncludeFailureDetails: true
- AllowEmptyHosts: true — HTTP 1.0 requests don't have a host header.
Customization
- AllowedHosts can be a comma-separated list of host names or IP addresses.
- AllowedHosts can be a wildcard pattern like *.google.com.
When you host the .NET Application using the Kestrel server exposed to public internet. You must use the Host Filtering middleware to allow only the allowed hosts to access your application.
The default options would mean that any HTTP request with any host header value will be served.
The LinkGenerator service is recommended to be used to generate the absolute links to your application,
either in the response or in the email.
But if you are not filtering the Host header,
then the attacker can send any host header value and generate the valid link to their website.
Note that LinkGenerator extension methods allow you to pass the host,
but if none provider it will default to the host header value.
How to use it?
Default Minimal API template adds the following JSON property in the appsettings.json file.
{
  "AllowedHosts": "*"
}
var builder = WebApplication.CreateBuilder(args);
var app = builder.Build();
//It Uses appsettings.json file to read the allowed host names. By default is is * which means all hosts are allowed.
app.UseHostFiltering();
app.MapGet("/", () => "Hello World!");
app.Run();
You can customize the JSON property in the appsettings.json file.
//You can not use Port Number in the AllowedHosts.
{
  "AllowedHosts": "localhost,*.example.com,139.343.3434.3434"
}
services.AddOptions<HostFilteringOptions>()
.BindConfiguration(builder.Configuration.GetRequiredSection("HostFilteringOptions").Path);
/////////////// OR ////////////////
services.AddHostFiltering(options =>
{
    options.AllowedHosts = new List<string>() { "*" };
    options.AllowEmptyHosts = true;
    options.IncludeFailureMessage = true;
});
Best Practices
- Should be added after the ExceptionHandler middleware.
- Attacker can easily manipulate the host header, thus this middleware validates it before serving the request.
- Example: If you ask your security to let only in person with the name of adnan. Anyone pretending to be adnan will be allowed.
- Read the source code in .NET repository here.
- A Security Issue
Evil Link Generation Example
var builder = WebApplication.CreateBuilder();
var app = builder.Build();
app.MapGet("/welcome", () => "Hello World!").WithName("Welcome");
app.MapGet("/handmewelcomeurl", (HttpContext httpContext,LinkGenerator linkGenerator) =>
{
    var uriByName = linkGenerator.GetUriByName(httpContext, "Welcome");
    return uriByName;
}).WithName("HandMeWelcomeUrl");
app.Run();
Given your server is running on http://localhost:5000.
GET http://localhost:5149/handmewelcomeurl
Host: evilsite.com
What response did you expect?
It will not be http://localhost:5000/welcome but instead it will be http://evilsite.com/welcome.
To fix it, you have to add only localhost to the allowed hosts. After that, you will receive a 400-Bad Request response.
{
  "AllowedHosts": "localhost"
}
Header Propagation Middleware
Purpose
It propagates the headers from the incoming request to the outgoing request. For example, a Service receives a header named X-Custom-Header, and it calls Service B, and you would like to send the header whenever this call is made. That is Propagation of Headers.
Must install the package Microsoft.AspNetCore.HeaderPropagation from NuGet.
In Legacy applications if you have not adapted the Open Telemetry and you rely on correlation id to trace the request across multiple services. For example, your request flows through a reverse proxy which adds certain e-commerce, unique request id and other headers on which your system relies on. You could use the Header Propagation middleware to propagate the headers to the outgoing request. Simple correlation header flow will give you an end to end logs of the request. Currently, I am using this technique in production to trace the request across multiple services which uses different technologies like Node.js, Java, .NET 6, .NET Framework 4.8.
Defaults
- Allows to configure the headers to be propagated to the outgoing HTTP requests using
HttpClient. - Allows configuring the headers to be propagated with value provider function which does have access to
HTTPContext. - Allows changing the header name from incoming request to outgoing request.
Customization
- You have to explicitly configure the headers to be propagated. No default.
How to use it?
var builder = WebApplication.CreateBuilder(args);
builder.Services.AddHeaderPropagation(options =>
{
    //Add the header to be propagated.
    options.Headers.Add("X-Custom-Header");

    //Add the header to be propagated with value provider function.
    options.Headers.Add("CorelationId", context =>
    {
        var request = context.Request;
        var header = request.Headers["CorelationId"].FirstOrDefault();
        if (string.IsNullOrEmpty(header))
        {
            header = Guid.NewGuid().ToString();
        }
        return header;
    });
    options.Headers.Add("CorelationId", "X-CorelationId");
});
var app = builder.Build();
app.UseHeaderPropagation();
app.MapGet("/motto", async (HttpContext context, HttpClient client) =>
{
    //Now the outgoing request will have the header X-CorelationId and X-Custom-Header.
    // No need to add the header manually.
    var response = await client.GetAsync("http://localhost:5000/greeting");
    var content = await response.Content.ReadAsStringAsync();
    await context.Response.WriteAsync(content);
});
app.MapGet("/greeting", async (HttpContext context) =>
{
    //Read the header from the incoming request.
    var header = context.Request.Headers["X-CorelationId"].FirstOrDefault();
    await context.Response.WriteAsync($"Hello from Greeting Service. You are using {header}");
});
app.Run();
Best Practices
- Should be added after the ExceptionHandler middleware.
- Every server receiving the request has a limit on the number of headers it can receive. It also has limit on the size of the header. Kestrel has a limit of 100 headers and 32KB size. You should take this into consideration when propagating headers.
- Keep the number of headers and size to the minimum. Minimum means only add if it is required. Do not violate You ain't going to need it principle (YAGNI).
- Read the source code in .NET repository here
Feedback
I would love to hear your feedback, feel free to share it on Twitter.